

Adding eyelets (grommets) on stretchy knit fabrics can be a challenging as the fabric has a tendency to slip through after a while and several times I have ended up with a big hole and a loose metal ring. Not fun!
But I’ve come up with a method that is pretty solid and could in fact be used on all sorts of fabrics because it resists stress well.
For attaching eyelets on knit fabrics you’ll need
- Firm non stretch fusible interfacing (I recommend Vlieseline H250)
- A scrap of knit fabric (optional, but recommended when using thin knits)
- Eyelets/grommets and suitable tools

1. Secure the fabric
Cut a circle of the interfacing, press it on the fabric and mark where the hole should be

2. Make a hole that is smaller than you would normally do
This is very important since knit fabric will grow a bit more even when interfaced so the hole should be smaller than you would have done on a woven fabric


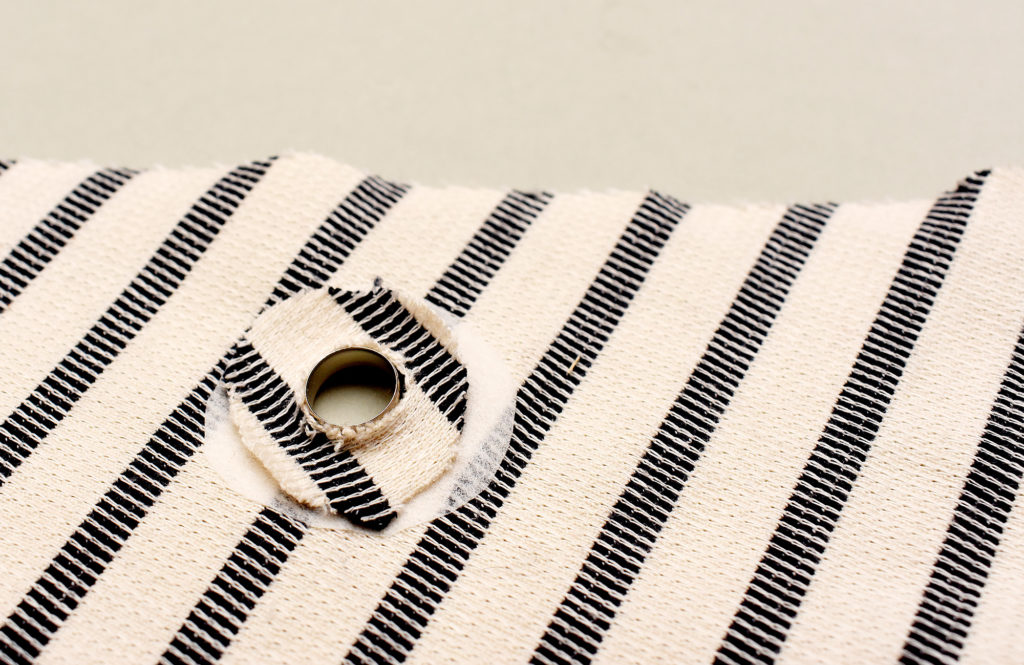
3. Insert the eyelet
As you can see there some fabric around the edges of the. This is because the hole is a bit smaller. Too much fabric will make it hard for the washers to really fit in with the eyelets. And a hole that is too big will cause the fabric to stretch out and slip out of the eyelet. So there is a sweet spot for sure!
4. Add a fabric scrap for extra insurance (optional)
This is important if you are working with a thin stretch knit, like rayon jersey. The eyelets needs some thickness to really “stick” to the fabric. So adding an extra layer is a good idea.

5. Add the washer
Don’t ask me which side should be up, I’m always confused! But I love Prym’s tutorials on YouTube, they are very clear on this subject.

6. Secure the washer to the eyelet
This is a pretty straight forward step. If you are using a hammer make sure it hits flat on the surface and I’ve also found that hammering with a firm but not super hard beat gives me the best result.


7. Inspection time
Don’t skip on this step, because this is an indicator of a successful assembly.
The eyelet should sit tight to the fabric on the right side, make sure there are no glitches.
The same goes for the washer on the wrong side, use your nails or a needle run through the entire edge to make sure it sits even and close.
There you go!
I hope this will be helpful for others, I’ve tried many different ways and this is the one that has worked the best. Plus a bonus tip; if you are attaching eyelets on a waistband made of thin knit, interface the side that is closest to body with a soft stretchy fusible since the metal might rub against or skin and could possible also wear down the fabric!

10 Comments
PsychicSewerKathleen
WOW Johanna again this was hugely helpful! I’ve never attached an eyelet but I know hoodies are in my future since I have such a difficult time getting a rtw that actually fits right with my rather abundant top 🙂 and narrower hip and there is no better way to secure the exit area of a tie than an eyelet. I wouldn’t have thought to interface and add an extra piece of fashion fabric either but it makes total sense. I’ll be bookmarking this page too! 🙂
Johanna
Agree, eyelets are great! Another option is machine stitched buttonholes, but they come with their own sets of challenges. I should do a tutorial on that too in the future! And stabilizing is everything when it comes to eyelets, and the same goes for snaps. I’ve had several RTW snaps rip because of poor stabilization. And all the best to your hoodie project, it sounds like a fun challenge!
Lynsey
Great tutorial, thank you,. I will definitely come back to this when I’m ready to give it a try. I’m always nervous when it’s so final and can’t be undone but the result looks awesome.
Johanna
You’re welcome! Just do a sample or two first to get feel of it, I still do that just to calm my nerves because as you say, the result is so final. I also add eyelets before I start sewing, so if I mess up I haven’t wasted a lot of time sewing only to not be able to use it. But eyelets are actually quite easy to attach!
Jojo Sewist
Talented Lady, is there any part of making your own clothing you cannot do? Does any of it intimidate you? Do you have any tips for purchasing fabric online? Seems I am never happy w/the fabric regardless of the price. Help, because of this I am ready to give up sewing after 50+ years.
Julie
Where did you get your grommet kit?
Gemam
Any solutions for when you read this after a disaster hole has occurred!!
Private Proxies
I haven’t checked in here for a while as I thought it was getting boring, but the last several posts are good quality so I guess I’ll add you back to my everyday bloglist. You deserve it my friend 🙂
Comments are closed.